Linux Kernel
in a nutshell
Автор - Greg Kroah-Hartman.
С 1996 года работает над ядром,с 1999 - с драйверами.
На данный момент он является майнтейнером USB,PCI,driver core,sysfs.
Автор udev.
Является одним из разработчиков Gentoo.
Со-автор Linux Device Driver III.
Работает в SUSE Labs/Novell.
Необходимые условия для сборки ядра
Эта часть описывает инструментальные средства и утилиты , необходимые для конфигурации и сборки ядра.
Также вам не помешает лишний раз проконсультироваться с докой , которая лежит в
исходниках ядра в каталоге Documentation/Change.
Этот раздел основан на версии 2.6.18.
Если у вас другая версия , автор ни за что не отвечает.
Утилиты для сборки ядра
В большинство линуксовых дистрибутивов эти утилиты входят в набор базовых пакетов.
И как правило нет необходимости загружать и устанавливать их отдельно.
Для сборки ядра нам понадобятся 3 пакета : компилятор gcc , линкер и утилита
make.
В этом разделе описывается содержимое этих пакетов.
Compiler
Ядро написано на C , включая ассемблерные вставки.
Для сборки ядра нужен компилятор gcc.
Большинство линуксовых дистрибутивов имеют пакет , который так и называется -
gcc.
Если вы своими руками хотите собрать компилятор, тогда вам сюда : http://gcc.gnu.org.
Для версии ядра 2.6.18 можно использовать версию gcc не старее 3.2 .
Также учтите , что использование новейшей версии gcc - тоже не очень хорошая идея.
Может так случиться , что она окажется вообще не в состоянии собрать ядро.
Для определения текущей версии ggc у себя наберите команду :
$ gcc --version
Linker
Компилятор gcc
нуждается в дополнительной линковке и пакете
binutils.
Пакет binutils
включает различные утилиты для манипуляций с обьектными файлами.
Если у вас нет этого пакета , вы можете найти его тут :
http://www.gnu.org/software/binutils.
Для сборки ядра 2.6.18 требуется версия этого пакета как минимум 2.12.
Для определения локальной версии binutils наберите команду :
$ ld -v
make
make
- это утилита , которая пробегается по дереву исходников и определяет ,
какие из них нужно собирать,и затем вызывает компилятор.
Эта утилита находится в пакете с одноименным названием.
Если вы сами хотите проинсталлировать
make,
вы можете найти его тут : http://www.gnu.org/software/make.
Для 2.6.18 нужна версия как минимум 3.79.1 make
Рекомендуется поставить последнюю стабильную версию.
Для определения версии наберите команду :
$ make --version
Другие утилиты и текущая версия ядра
Для ряда других утилит версия ядра может оказаться критической.
В этой секции описываются такие утилиты , которые уже стоят в системе.
После апгрэйда ядра может возникнуть необходимость в обновлении некоторых таких пакетов на вашей системе.
util-linux
Пакет util-linux
-это набор маленьких утилит , выполняющих различные задачи.
Они занимаются монтированием и созданием дисковых партиций,
а также манипуляцией системного таймера.
Вы можете найти его здесь :
http://www.kernel.org/pub/linux/utils/util-linux.
Актуальной является версия как минимум 2.10.
Рекомендуется иметь последнюю версию.
Для определения версии наберите команду :
$ fdformat --version
module-init-tools
Этот модуль необходим в случае использования модулей ядра.
Он может добавить/удалить порцию кода к тому , который уже работает в ядре.
Не секрет , что полезно собирать и запускать только те драйвера ,
которые реально представлены в текущем железе.
Все линуксовые дистрибутивы делают выборочную загрузку драйверов
вместо того , чтобы грузить все подряд.
Процесс загрузки модуля ядра в версии 2.6 радикально переделан.
Линкер , загружающий модуль , теперь встроен в ядро.
В ранних дистрибутивах для этого был пакет modutils.
Теперь вам нужен пакет module-init-tools.
Загрузить этот пакет можно здесь :
http://www.kernel.org/pub/linux/utils/kernel/module-init-tools.
Нам нужна как минимум версия 0.9.10.
Для определения версии наберите команду :
$ depmod -V
Файловые утилиты
Есть большой набор утилит для различных файловых систем для создания,
форматирования,конфигурации дисковых партиций.
Пакет util-linux
включает в себя несколько таких утилит ,
но как правило каждая файловая система имеет свои пакеты.
ext2/ext3/ext4
Файловые системы
ext3
и
ext4
работают с теми же утилитами , с которыми работала и ext2.
Для работы с ними нужен пакет
e2fsprogs
Его можно загрузить тут :
http://e2fsprogs.sourceforge.net.
Актуальна версия не ниже 1.29.
Для определения версии
e2fsprogs
наберите команду :
$ tune2fs
JFS
Для использования файловой системы JFS от IBM,
вам нужен пакет jfsutil.
Загрузить его можно тут : http://jfs.sourceforge.net.
Нужна как минимум версия 1.1.3 пакета jfsutils.
Для определения ее верси , наберите команду :
$ fsck.jfs -V
ReiserFS
Для использования ReiserFS вам нужен пакет
reiserfsprogs.
Загрузить его можно тут : http://www.namesys.com/download.html.
Актуальна версия не ниже 3.6.3.
Для определения версии наберите команду :
$ reiserfsck -V
XFS
Для использования файловой системы XFS от SGI,
вам нужен пакет xfsprogs.
Загрузить его можно тут : http://oss.sgi.com/projects/xfs.
Актуальна версия не ниже 2.6.0.
Для определения версии наберите команду :
$ xfs_db -V
Quotas
Для использования квотирования , вам нужен пакет
quota-tools.*
Этот пакет квотирует пользователей по уровню использования файлового пространства.
Загрузить его можно тут : http://sourceforge.net/projects/linuxquota.
Актуальна версия не ниже 3.09.
Для определения версии наберите команду :
$ quota -V
NFS
Для использования файловой системы NFS вам нужен пакет nfs-utils.
С его помощью можно смонтировать партицию как клиента , а также запустить NFS-сервер.
Загрузить его можно тут : http://nfs.sf.net.
Актуальна версия не ниже 1.0.5.
Для определения версии наберите команду :
$ showmount --version
udev
udev -
это программа,которая позволяет иметь device-именованную систему в каталоге
/dev.
Также существует динамический /dev,
который похож на уже удаленную файловую систему devfs.
Почти все дистрибутивы используют udev
для управления каталогом /dev.
К сожалению, udev
завивсит от структуры /sys,
которая меняется от версии к вкрсии.
Рекомендуется пользоваться версией udev,
которая идет с вашим дистрибутивом,поскольку она завязана
на особенности загрузки самого ядра .
При желании эту утилиту можно найти тут : http://www.kernel.org/pub/linux/utils/kernel/hotplug/udev.html.
Актуальна версия 081.
Для определения версии наберите :
$ udevinfo -V
Process tools
Пакет procps
включает в себя утилиты ps и top,
которые используются для мониторинга процессов.
Загрузить их можно тут : http://procps.sourceforge.net.
Актуальна версия 3.2.0.
Для определения версии наберите :
$ ps --version
PCMCIA tools
In
order to properly use PCMCIA devices with Linux, a userspace helper
program must be used to set up the devices. For older kernel versions,
this program was called pcmcia-cs, but that has been replaced with a much simpler system called pcmciautils. If you wish to use PCMCIA devices, you must have this package installed for them to work properly.
As of the 2.6.18 kernel release, the 004 release of pcmciautilsis
the oldest that works properly with the kernel. But the latest version
is recommended in order to take advantage of newer features in the
PCMCIA subsystem, such as automatic driver loading when new devices are
found.
To determine which version of pcmciautilsyou have on your system, run the following command:
$ pccardctl -V
Получение Kernel Source
When you are building your own kernel, you want the latest stable release.
Many distributions provide their own packages ofkernel sources, but
these are rarely the most cutting-edge, recent versions. The
distribution packages have the advan-tage
ofbeing built to be compatible with the compiler and other tools
provided by the distribution (Chapter 2 explains the importance oftheir
being compatible) but they may not end up providing the functionality
or performance you want. If you can create your own environment with
the latest kernel, compiler, and other tools, you will be able to build
exactly what you want. This chapter focuses on deter-mining which kernel sources to download, and how to obtain them.
What Tree to Use
In the past, the Linux kernel was split into only two trees, the “development” branch and the “stable” branch. The development branch was denoted by an odd number for the second release number, while the stable branch used
even numbers. So, as an example, the 2.5.25 release was a development
kernel, while the 2.4.25 release is a stable release.
But
after the 2.6 series was created, the kernel developers decided to
abandon this method ofhaving two separate trees, and declared that all
2.6 kernel releases would be considered “stable,” no matter how quickly
development was happening. The few months between the major 2.6
releases would allow kernel developers the time to add new features and
then stabilize them in time for the next release. Combined with this, a
“-stable” kernel branch has been created that releases bug fixes and
security updates for the past kernel release, before the next major 2.6
release happens.
This
is all best explained with some examples, illustrated in Figure 3-1.
The kernel team released the 2.6.17 kernel as a stable release. Then
the developers started working on new features and started releasing
the -rc versions as devel-opment kernels so that people could help test and debug the changes. After
everyone
agreed that the development release was stable enough, it was released
as the 2.6.18 kernel. This whole cycle usually takes about two to three
months, depending on a variety of factors.
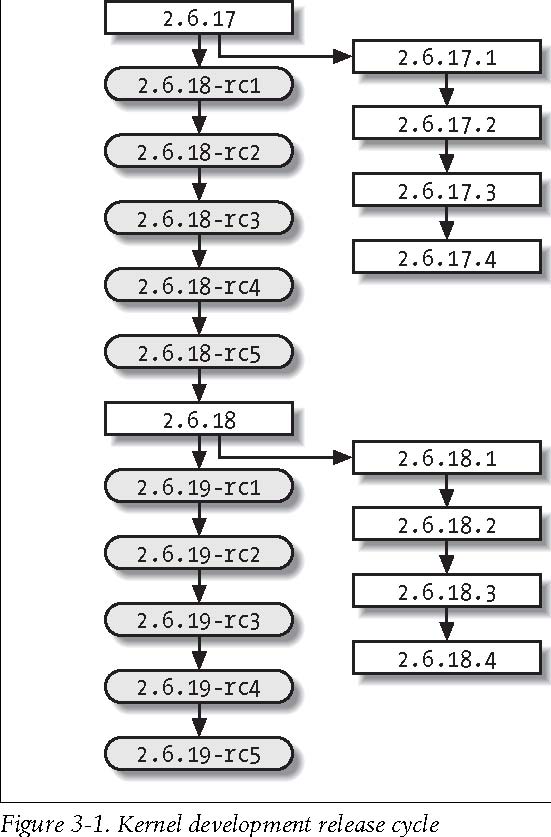
While
the development ofthe new features was happening, the 2.6.17.1,
2.6.17.2, and other stable kernel versions were released, containing
bug fixes and security updates.
Ifyou
wish to just use the latest kernel for your work, it is recommended
that you use the stable kernel releases. Ifyou wish to help the kernel
developers test the features of the next kernel release and give them
feedback, use the development kernel release. For the purpose ofthis
chapter, we will assume that you are using a stable kernel release.
Where to Find the Kernel Source
All of the source code for the Linux kernel can be found on one of the kernel.org sites,
a worldwide network ofservers that mirror the Linux source code,
enabling anyone to find a local server close to him. This allows the
main kernel servers to be responsive to the mirror sites, and lets
users download the needed files as quickly as possible.
The main http://www.kernel.org site shows all ofthe current kernel versions for the various different kernel trees, as shown in Figure 3-2.
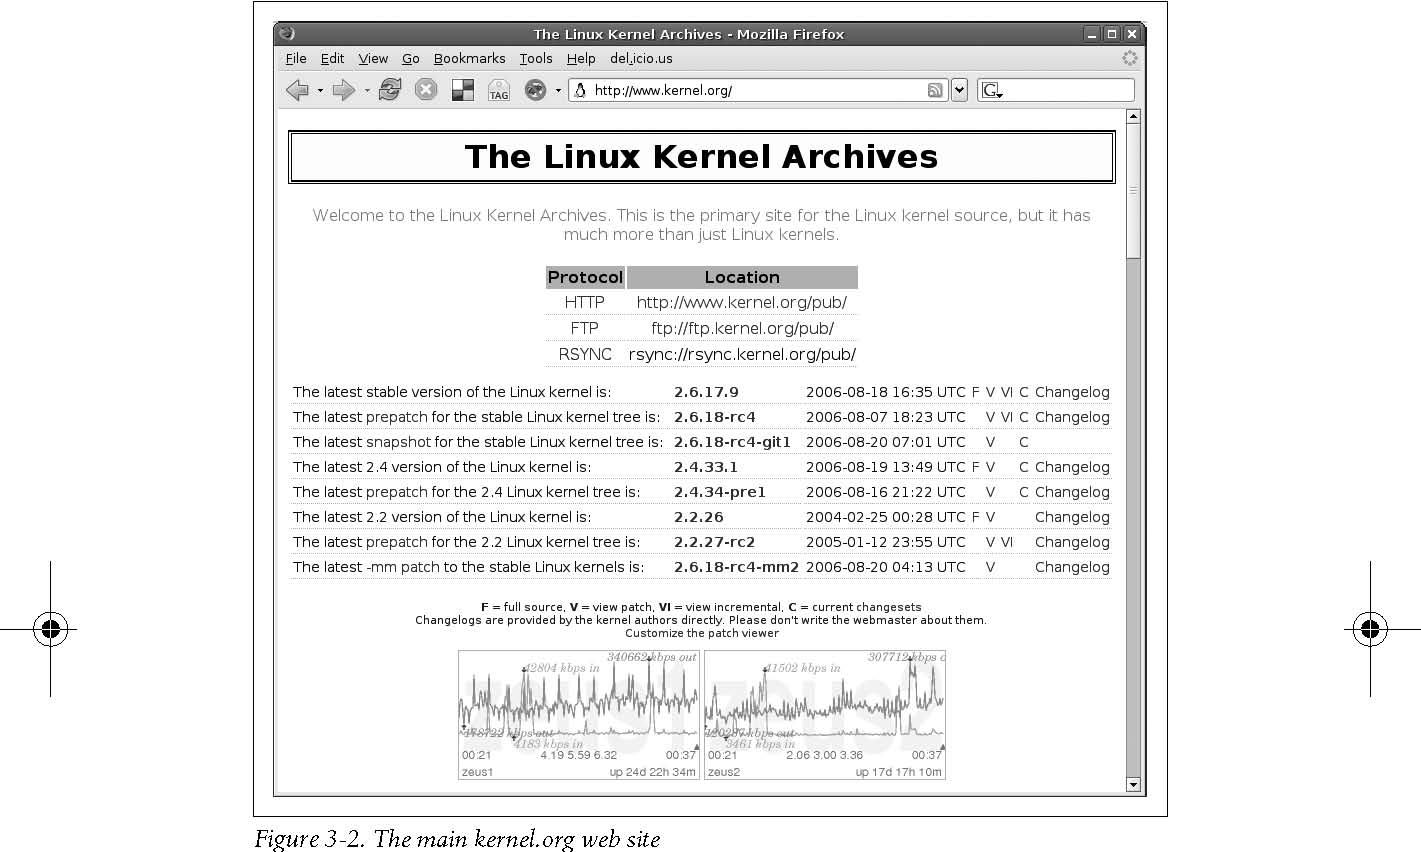
To download the latest stable kernel version, click on the F character on the line for the kernel version. This will download the full source tree. Or you can navi-gate to the proper subdirectory for all of the 2.6 kernel versions, http://www.us. kernel.org/pub/linux/kernel/v2.6/, shown in Figure 3-3.
It is also possible to download the kernel source from the command line, using the wget or curl utilities, both ofwhich should come with your Linux distribution.
To download the 2.6.17.8 kernel version using wget, enter:
$ wget http://www.kernel.org/pub/linux/kernel/v2.6/linux-2.6.17.8.tar.gz --17:44:55--http://www.kernel.org/pub/linux/kernel/v2.6/linux-2.6.17.8. tar.gz
=> `linux-2.6.17.8.tar.gz'
Resolving www.kernel.org... 204.152.191.5, 204.152.191.37
Connecting to www.kernel.org|204.152.191.5|:80... connected.
HTTP request sent, awaiting response... 200 OK
To download it using curl:
$ curl http://www.kernel.org/pub/linux/kernel/v2.6/linux-2.6.17.8.tar.gz \ -o linux-2.6.17.8.tar.gz
For a quick and easy way to determine the latest kernel versions, use the informa-tion available at http://www.kernel.org/kdist/finger_banner, illustrated by Figure 3-4.
What to Do with the Source
Now
that you have downloaded the proper kernel source, where is it supposed
to go? We suggest creating a local directory in your home directory
called linux to hold all of the different kernel source files:
$ mkdir ~/linux
Now move the source code into this directory:
$ mv ~/linux-2.6.17.8.tar.gz ~/linux/
And go into the linux directory:
$ cd ~/linux$ lslinux-2.6.17.8.tar.gz
Now that the source code is in the proper directory, uncompress the tree:
$ tar -xzvf linux-2.6.17.8.tar.gz
The screen will be filled with files that are uncompressed, and you will be left with the following in the linux/ directory:
$ ls
linux-2.6.17.8.tar.gz
linux-2.6.17.8/
Конфигурация и сборка
Now
that you have downloaded the source for your selected kernel version
and installed it into a local directory, it is time to build the code.
The first step is to configure the kernel with the appropriate options;
the kernel can then be compiled. Both tasks are done through the
standard make utility.
Creating a Configuration
The kernel configuration is kept in a file called .config in the top directory of the kernel source tree. If you have just expanded the kernel source code, there will be no .config file,
so it needs to be created. It can be created from scratch, created by
basing it on the “default configuration,” taken from a running kernel
version, or taken from a distribution kernel release. We will cover the
first two methods here, and the last two methods in Chapter 7.
Configuring from Scratch
The most basic method of configuring a kernel is to use the make config method:
$ cd linux-2.6.17.10$ make config
make config
scripts/kconfig/conf arch/i386/Kconfig
*
-
*
-
Linux Kernel Configuration
*
*
-
*
-
Code maturity level options * Prompt for development and/or incomplete code/drivers (EXPERIMENTAL) [Y/n/?]
Y
*
* General setup
*
Local version - append to kernel release (LOCALVERSION) []
Automatically append version information to the version string
(LOCALVERSION_AUTO) [Y/n/?] Y
...
The
kernel configuration program will step through every configuration
option and ask you if you wish to enable this option or not. Typically,
your choices for each option are shown in the format [Y/m/n/?] The capitalized letter is the default, and can be selected by just pressing the Enter key. The four choices are:
y Build directly into the kernel.
n Leave entirely out of the kernel.
m Build as a module, to be loaded if needed.
? Print a brief descriptive message and repeat the prompt.
The
kernel contains almost two thousand different configuration options, so
being asked for every individual one will take a very long time.
Luckily, there is an easier way to configure a kernel: base the
configuration on a pre-built configuration.
Default Configuration Options
Every kernel version comes with a “default” kernel configuration. This configura-tion
is loosely based on the defaults that the kernel maintainer of that
architecture feels are the best options to be used. In some cases, it
is merely the configuration that is used by the kernel maintainer
himself for his personal machines. This is true for the i386
architecture, where the default kernel configuration matches closely
what Linus Torvalds uses for his main development machine.
To create this default configuration, do the following:
$ cd linux-2.6.17.10$ make defconfig
A huge number of configuration options will scroll quickly by the screen, and a .config file
will be written out and placed in the kernel directory. The kernel is
now successfully configured, but it should be customized to your
machine in order to make sure it will operate correctly.
Modifying the Configuration
Now
that we have a basic configuration file created, it should be modified
to support the hardware you have present in the system. For details on
how to find out which configuration options you need to select to
achieve this, please see Chapter 7. Here we will show you how to select
the options you wish to change.
There are three different interactive kernel configuration tools: a terminal-based one called menuconfig, a GTK+-based graphical one called gconfig, and a QT-based graphical one called xconfig.
Console Configuration Method
The menuconfig way
of configuring a kernel is a console-based program that offers a way to
move around the kernel configuration using the arrow keys on the
keyboard. To start up this configuration mode, enter:
$ make menuconfig
You will be shown a screen much like Figure 4-1.
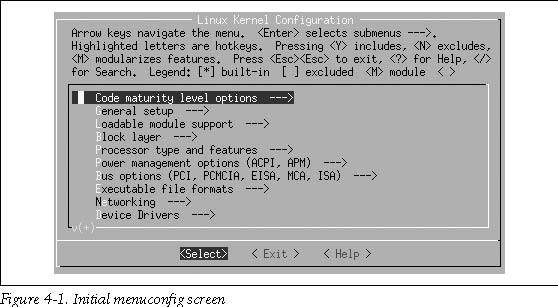
The
instructions for navigating through the program, and the meanings of
the different characters, are shown at the top of the screen. The rest
of the screen containing the different kernel configuration options.
The
kernel configuration is divided up into sections. Each section contains
options that correspond to a specific topic. Within those sections can
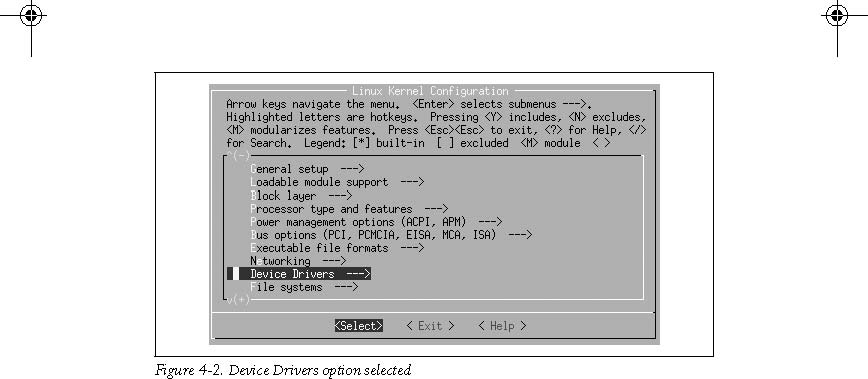
be sub-sections for various specialized topics. As an example, all kernel device drivers can be found under the main menu option Device Drivers. To enter that menu, move the arrow key down nine times until the line Device Drivers ---> is highlighted, as shown in Figure 4-2.
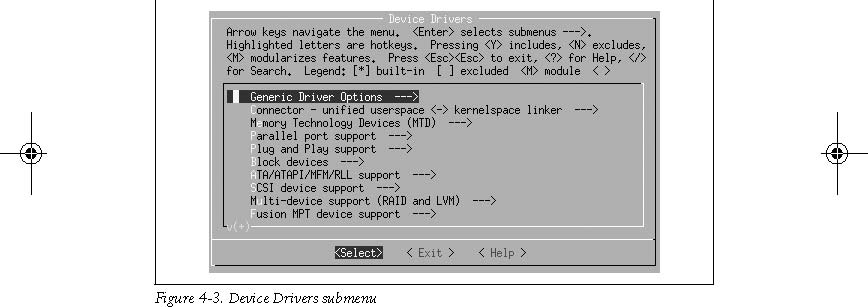
Then press the Enter key. It will move you into the Device Drivers submenu and show it as illustrated in Figure 4-3.
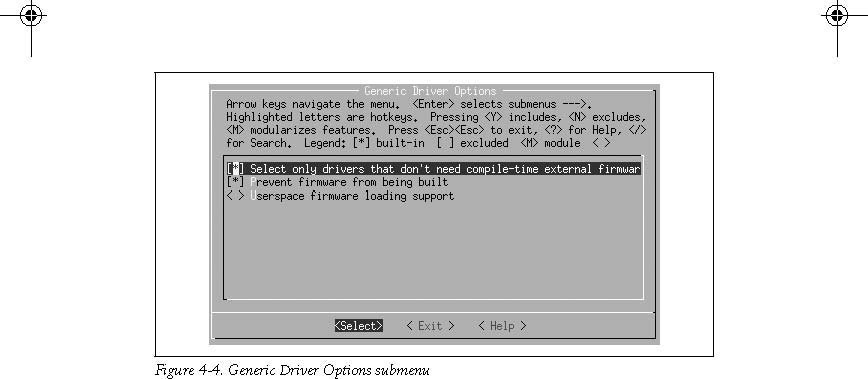
You can continue to move down through the menu hierarchy the same way. To see the Generic Driver Options submenu, press Enter again, and you will see the three options shown in Figure 4-4.
The first two options have a [*] mark by them. That means that this option is selected (by virtue of the * being in the middle of the [] characters), and that this option is a yes-or-no option. The third option has a <> marking, showing that this option can be built into the kernel (Y), built as a module (M), or left out alto-gether (


If the option is selected with Y, the angle brackets will contain a * character. If it is selected as a module with an M, they will contain an M character. If it is disabled with N, they will show only a blank space.
So,
if you wish to change these three options to select only drivers that
do not need external firmware at compile time, disable the option to
prevent firmware from being built, and build the userspace firmware
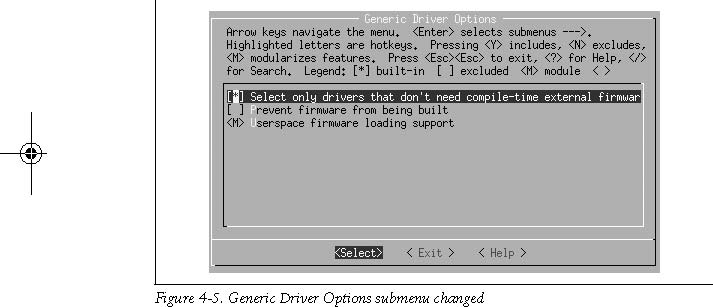
loader as a module, press Y for the first option, N for the second option, and M for the third, making the screen look like Figure 4-5.
After
you are done with your changes to this screen, press either the Escape
key or the right arrow followed by the Enter key to leave this submenu.
All of the different kernel options can be explored in this manner.
When
you are finished making all of the changes you wish to make to the
kernel configuration, exit the program by pressing the Escape key on
the main menu. You will be shown the screen in Figure 4-6, asking
whether you wish to save your changed kernel configuration.

Press Enter to save the configuration, or if you wish to discard any changes made, press the right arrow to move to the <No> selection and then press Enter.
Graphical Configuration Methods
The gconfig and xconfig methods
of configuring a kernel use a graphical program to allow you to modify
the kernel configuration. The two methods are almost identical, the
only difference being the different graphical toolkit with which they
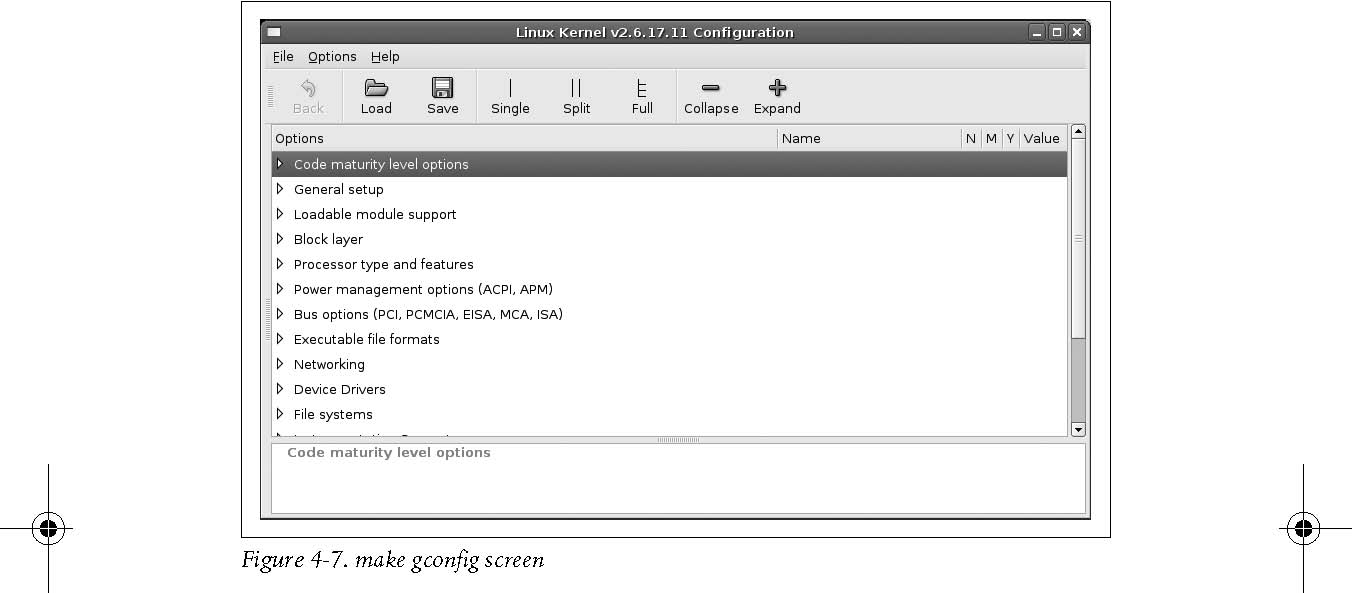
are written. gconfig is written using the GTK+ toolkit and has a two-pane screen looking like Figure 4-7.
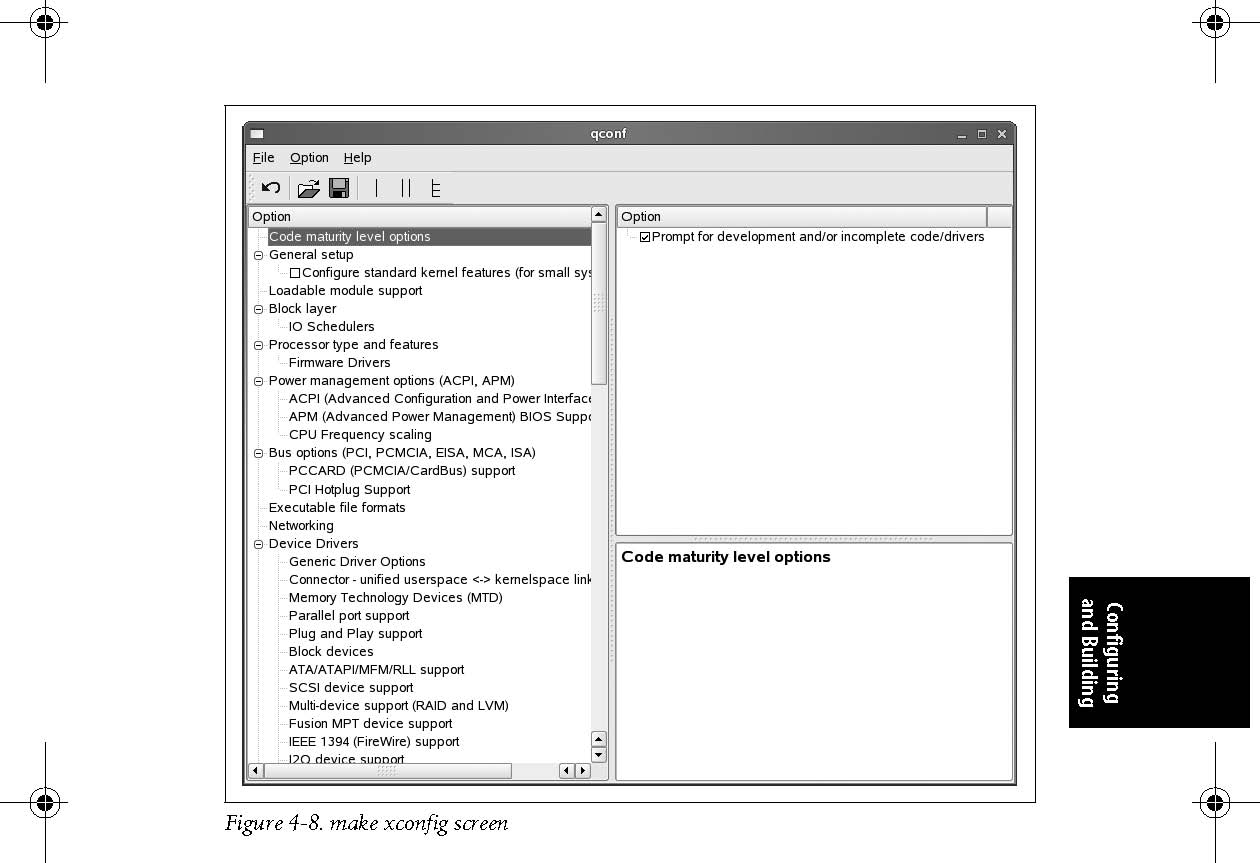
The xconfig method is written using the QT toolkit and has a three-pane screen looking like Figure 4-8.
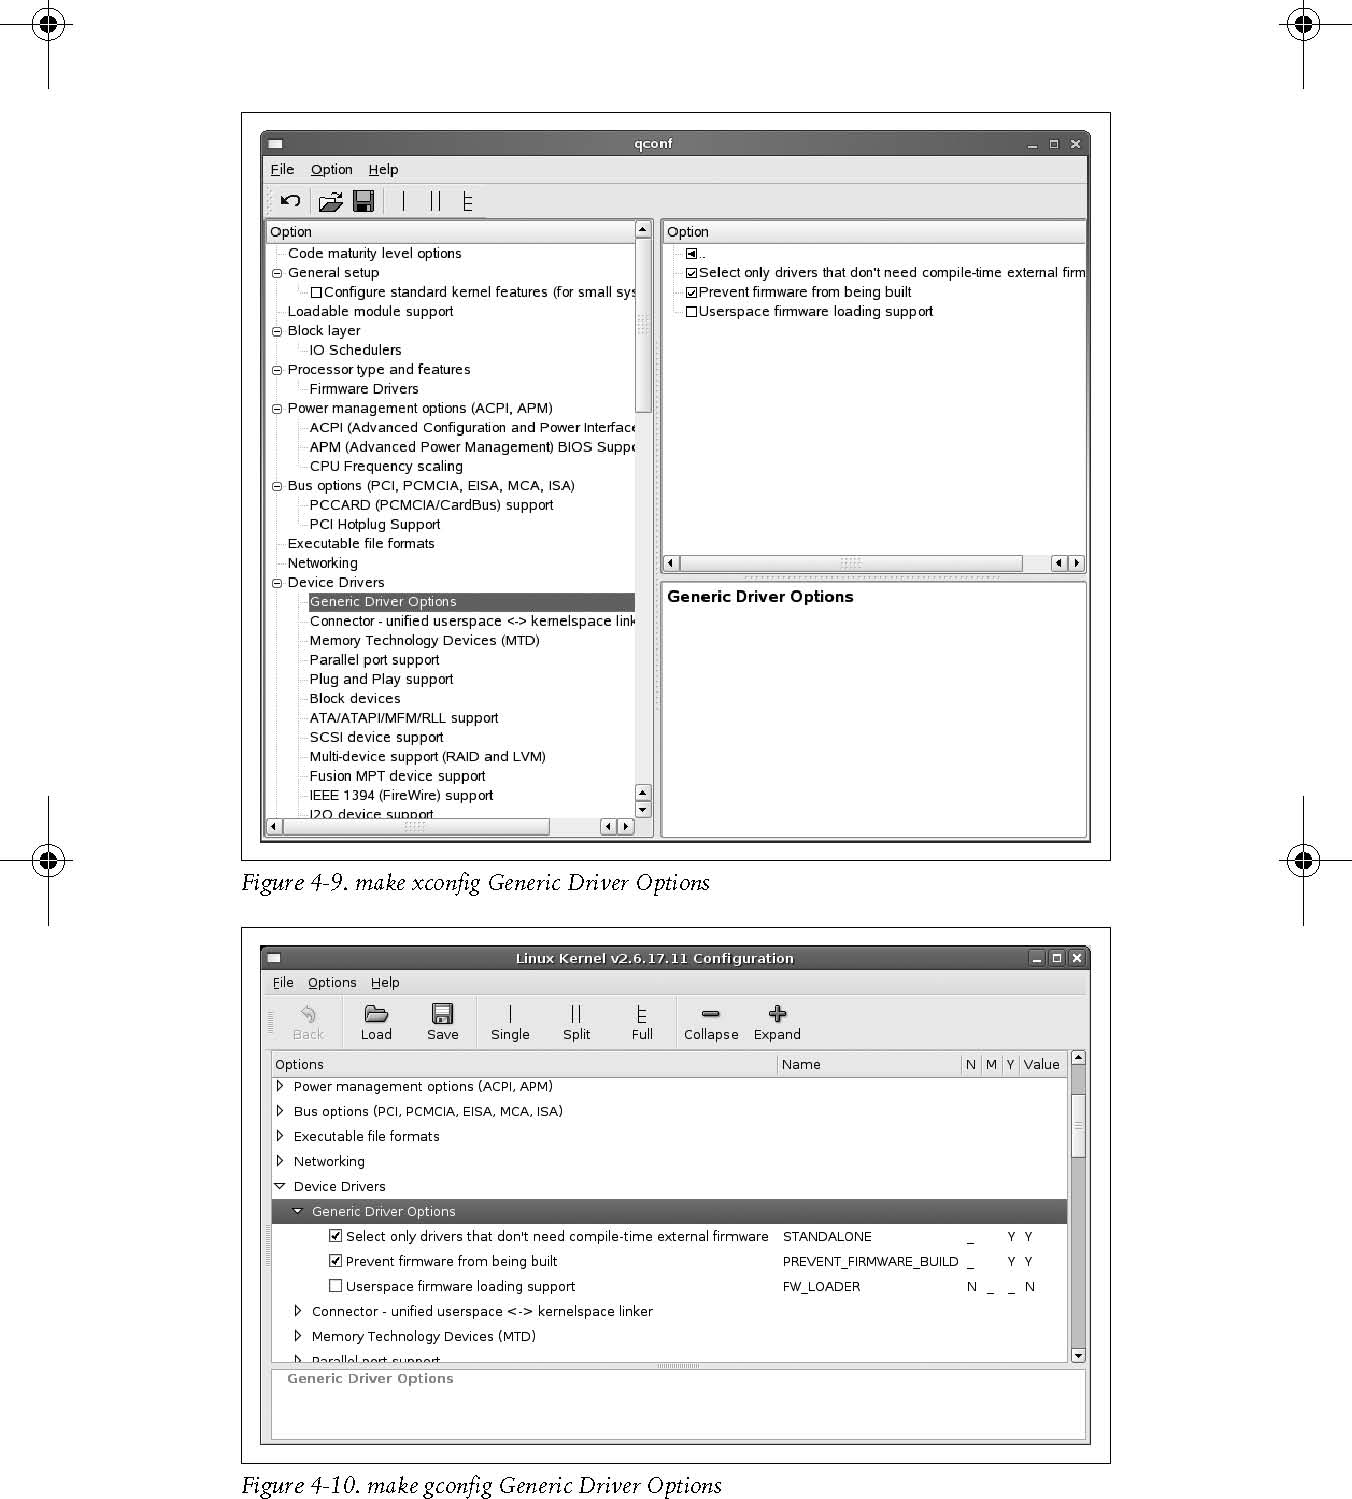
Use the mouse to navigate the submenus and select options. For instance, you can use it in Figure 4-8 to select the Generic Driver Options submenu of the Device Drivers menu. This will change the xconfig screen to look like Figure 4-9. The corresponding gconfig screen is Figure 4-10.
Changing
this submenu to disable the second option and make the third option be
built as a module causes the screens to look like Figures 4-11 and
4-12.
Please note that in the gconfig method,
a checked box signifies that the option will be built into the kernel,
whereas a line though the box means the option will be built as a
module. In the xconfig method, an option built as a module will be shown with a dot in the box.
Both
of these methods prompt you to save your changed configuration when
exiting the program, and offer the option to write that configuration
out to a different file. In that way you can create multiple, differing
configurations.
Building the Kernel
Now
that you have created a kernel configuration that you wish to use, you
need to build the kernel. This is as simple as entering a one-word
command:
$ make CHK include/linux/version.h UPD include/linux/version.h SYMLINK include/asm -> include/asm-i386
|
SPLIT |
include/linux/autoconf.h -> include/config/* |
|
CC |
arch/i386/kernel/asm-offsets.s |
|
GEN |
include/asm-i386/asm-offsets.h |
|
CC |
scripts/mod/empty.o |
|
HOSTCC |
scripts/mod/mk_elfconfig |
|
MKELF |
scripts/mod/elfconfig.h |
|
HOSTCC |
scripts/mod/file2alias.o |
|
HOSTCC |
scripts/mod/modpost.o |
|
HOSTCC |
scripts/mod/sumversion.o |
|
HOSTLD |
scripts/mod/modpost |
|
HOSTCC |
scripts/kallsyms |
|
HOSTCC |
scripts/conmakehash |
|
HOSTCC |
scripts/bin2c |
|
CC |
init/main.o |
|
CHK |
include/linux/compile.h |
|
UPD |
include/linux/compile.h |
|
CC |
init/version.o |
|
CC |
init/do_mounts.o |
|
... |
|
Running make causes
the kernel build system to use the configuration you have selected to
build a kernel and all modules needed to support that configuration.* While the kernel is building, make displays the individual filenames of what is currently happening, along with any build warnings or errors.
If
the kernel build finished without any errors, you have successfully
created a kernel image. However, it needs to be installed properly
before you try to boot from it. See Chapter 5 for how to do this.
It
is very unusual to get any build errors when building a released kernel
version. If you do, please report them to the Linux kernel developers
so they can be fixed.
Advanced Building Options
The
kernel build system allows you to do many more things than just build
the full kernel and modules. Chapter 10 includes the full list of
options that the kernel build system provides. In this section, we will
discuss some of these advanced build options. To see a full description
of how to use other advanced build options, refer to the in-kernel
documentation on the build system, which can be found in the Documentation/kbuild directory of the sources.
Building Faster on Multiprocessor Machines
The
kernel build system works very well as a task that can be split up into
little pieces and given to different processors. By doing this, you can
use the full power of a multiprocessor machine and reduce the kernel
build time considerably.
To build the kernel in a multithreaded way, use the -j option to the make program. It is best to give a number to the -j option that corresponds to twice the number of processors in the system. So, for a machine with two processors present, use:
$ make -j4
and for a machine with four processors, use:
$ make -j8
If you do not pass a numerical value to the -j option:
$ make -j
the
build system will create a new thread for every subdirectory in the
kernel tree, which can easily cause your machine to become unresponsive
and take a much longer time to complete the build. Because of this, it
is recommended that you always pass a number to the -j option.
* Older kernel versions prior to the 2.6 release required the additional step of make modules to build all needed kernel modules. That is no longer required.
Building Only a Portion of the Kernel
When
doing kernel development, sometimes you wish to build only a specific
subdirectory or a single file within the whole kernel tree. The kernel
build system allows you to easily do this. To selectively build a
specific directory, specify it on the build command line. For example,
to build the files in the drivers/usb/serial directory, enter:
$ make drivers/usb/serial
Using this syntax, however, will not build the final module images in that direc-tory. To do that, you can use the M= argument:
$ make M=drivers/usb/serial
which will build all the needed files in that directory and link the final module images.
When
you build a single directory in one of the ways shown, the final kernel
image is not relinked together. Therefore, any changes that were made
to the subdirectories will not affect the final kernel image, which is
probably not what you desire. Execute a final:
$ make
to have the build system check all changed object files and do the final kernel image link properly.
To build only a specific file in the kernel tree, just pass it as the argument to make. For example, if you wish to build only the drivers/usb/serial/visor.ko kernel module, enter:
$ make drivers/usb/serial/visor.ko
The build system will build all needed files for the visor.ko kernel module, and do the final link to create the module.
Source in One Place, Output in Another
Sometimes
it is easier to have the source code for the kernel tree in a read-only
location (such as on a CD-ROM, or in a source code control system), and
place the output of the kernel build elsewhere, so that you do not
disturb the original source tree. The kernel build system handles this
easily, by requiring only the single argument O= to tell it where to place the output of the build. For example, if the kernel source is located on a CD-ROM mounted on /mnt/cdrom/ and you wish to place the built files in your local directory, enter:
$ cd /mnt/cdrom/linux-2.6.17.11$ make O=~/linux/linux-2.6.17.11
All of the build files will be created in the ~/linux/linux-2.6.17.11/ directory. Please note that this O= option
should also be passed to the configuration options of the build so that
the configuration is correctly placed in the output directory and not
in the directory containing the source code.
Different Architectures
A
very useful feature is building the kernel in a cross-compiled manner
to allow a more powerful machine to build a kernel for a smaller
embedded system, or just to check a build for a different architecture
to ensure that a change to the source code did not break something
unexpected. The kernel build system allows you to specify a different
architecture from the current system with the ARCH= argument. The build system also allows you to specify the specific compiler that you wish to use for the build by using the CC= argument or a cross-compile toolchain with the CROSS_COMPILE argument.
For example, to get the default kernel configuration of the x86_64 architecture, you would enter:
$ make ARCH=x86_64 defconfig
To build the whole kernel with an ARM toolchain located in /usr/local/bin/, you would enter:
$ make ARCH=arm CROSS_COMPILE=/usr/local/bin/arm-linux-
It
is useful even for a non-cross-compiled kernel to change what the build
system uses for the compiler. Examples of this are using the distcc or ccache programs, both of which help greatly reduce the time it takes to build a kernel. To use the ccache program as part of the build system, enter:
$ make CC="ccache gcc"
To use both distcc and ccache together, enter:
$ make CC="ccache distcc"
|
